Requirements
- Your video card needs to support the UEFI. If it doesn’t support, you can’t do this.
- Your operating system should be installed in UEFI mode.
- Your processor needs to support virtualization.
1 - IOMMU Activation
We need to activate IOMMU technology to transfer devices from our main machine to the guest.
First of all, you need to activate IOMMU in the BIOS settings.
After /etc/default/grubwe’ll edit the file.
GRUB_CMDLINE_LINUX_DEFAULT= writing
for AMD amd_iommu=on iommu=pt
For Intel intel_iommu=on iommu=pt
we’re adding the post.
For example, my setting file:

NOTE: NVIDIA part is not important. They were before. Then we need to update our GRUB settings by running the group update command. Doing so is different from distribution to distribution.
Ubuntu/Mint/Debian sudo update-grub
Arch sudo grub-mkconfig -o /boot/grub2/grub.cfg
Fedora sudo grub2-mkconfig -o /boot/grub2/grub.cfg with you can.
Please call the GRUB update command to differently.
If you’re not using GRUB,
you’re using systemd-boot /boot/efi/loader/entries/ from the .conf extension file you will find your .conf extension
and enter the above commands in the options section, and then sudo bootctl update
you will run the command.
You need to restart your computer after these operations!
2 - IOMMU Groups
In this step we will look at the IOMMU group, which includes our video card.
If your video card is in which IOMMU group, you must add every item there to the virtual machine.
#!/bin/bash
shopt -s nullglob
for g in /sys/kernel/iommu_groups/*; do
    echo "IOMMU Group ${g##*/}:"
    for d in $g/devices/*; do
        echo -e "\t$(lspci -nns ${d##*/})"
    done;
done;
When you run this script, it will list all IOMMU groups.
IOMMU group with my video card:
IOMMU Group 12:
  01:00.0 VGA compatible controller [0300]: NVIDIA Corporation GA104 [GeForce RTX 3060 Ti GDDR6X] [10de:24c9] (rev a1)
  01:00.1 Audio device [0403]: NVIDIA Corporation GA104 High Definition Audio Controller [10de:228b] (rev a1)
So when I add 01:00.0 and 01:00.1 to my virtual machine, the process will be done.
If you’re two groups, not a group, for example:
IOMMU Group 8:
        00:1f.0 ISA bridge [0601]: Intel Corporation B85 Express LPC Controller [8086:8c50] (rev 05)
        01:00.0 VGA compatible controller [0300]: NVIDIA Corporation GP106 [GeForce GTX 1060 6GB] [10de:1c03] (rev a1)
        00:1f.2 SATA controller [0106]: Intel Corporation 8 Series/C220 Series Chipset Family 6-port SATA Controller 1 [AHCI mode] [8086:8c02] (rev 05)
        00:1f.3 SMBus [0c05]: Intel Corporation 8 Series/C220 Series Chipset Family SMBus Controller [8086:8c22] (rev 05)
IOMMU Group 9:
        01:00.1 Audio device [0403]: NVIDIA Corporation GP106 High Definition Audio Controller [10de:10f1] (rev a1)
Then you’ll have to transfer all the elements in both group 8 and 9 to the VM.
Also note the IOMMU group, which includes the voice controller of your motherboard. So we won’t have audio problems on our Windows machine. For me this group 11:
IOMMU Group 11:
  00:1f.0 ISA bridge [0601]: Intel Corporation Device [8086:7a87] (rev 11)
  00:1f.3 Audio device [0403]: Intel Corporation Alder Lake-S HD Audio Controller [8086:7ad0] (rev 11)
  00:1f.4 SMBus [0c05]: Intel Corporation Alder Lake-S PCH SMBus Controller [8086:7aa3] (rev 11)
  00:1f.5 Serial bus controller [0c80]: Intel Corporation Alder Lake-S PCH SPI Controller [8086:7aa4] (rev 11)
For now, take notes aside and we will do this in the following steps.
3 - Libvirt Installation
Once we’ve made the necessary virtualization settings, now we need to install and set up the applications that will do the virtualization. Download the following packages according to your own distribution
Ubuntu, Mint, Pop_OS and Debian based deployments: sudo apt install qemu-system-x86 libvirt-clients libvirt-daemon-system libvirt-daemon-config-network bridge-utils virt-manager ovmf
Arch Linux based deployments: sudo pacman -S virt-manager qemu vde2 ebtables iptables-nft nftables dnsmasq bridge-utils ovmf
Fedora based deployments: sudo dnf install @virtualization
OpenSuse: sudo zypper in libvirt libvirt-client libvirt-daemon virt-manager virt-install virt-viewer qemu qemu-kvm qemu-ovmf-x86_64 qemu-tools
3.1 Adjusting Libvirt and Virt-Manager
3.1.1 libvirtd.conf
First /etc/libvirt/libvirtd.conf we need to edit the file. Here you can use vim, nano or nvim terminal text
editors depending on your request. In order to be easy, I’ll base the
nano on the guide.
sudo nano /etc/libvirt/libvirtd.conf
– If you use graphic editors, you may encounter permission shortages.
3.1.2 Read Writing permissions and group
Delete # character from the following lines.
unix_sock_group = "libvirt"
unix_sock_rw_perms = "0770"
3.1.3 Debugging and Recording Retention
IMPORTANT: It is essential that you add these lines to understand and solve the problems you will encounter!
At the end of the file, add the following lines.
log_filters="3:qemu 1:libvirt"
log_outputs="2:file:/var/log/libvirt/libvirtd.log"
3.1.4 Add Yourself to the Libvirt Group
You need to add yourself to the group so you don’t have a permit problem with Libvirt.
sudo usermod -a -G kvm,libvirt $(whoami)
Let’s start the service later.
sudo systemctl enable --now libvirtd
Confirm if you are in the Libvirt group with the following command.
sudo groups $(whoami)
3.2 qemu.conf
Another setting file we will edit is qemu.conf
sudo nano /etc/libvirt/qemu.conf
Remove the character # in line 518 and 524.
user = "root"
group = "root"
root change the post with your username.
user = "oniichanx"
group = "oniichanx"
Then restart the libvirt.
sudo systemctl restart libvirtd
3.2.1 Launching Virtual Machine network Default
If you don’t want to encounter the start warning every time you turn on your computer, enter the command below.
sudo virsh net-autostart default
4 - Setting Virt Manager and Install Windows
Now it’s time to install Windows.
4.1 Required Files
You should download the latest Virtio ISO file.
You can download ISO file from optional Windows 10 or Windows 11 official sites
4.2 VM Installation
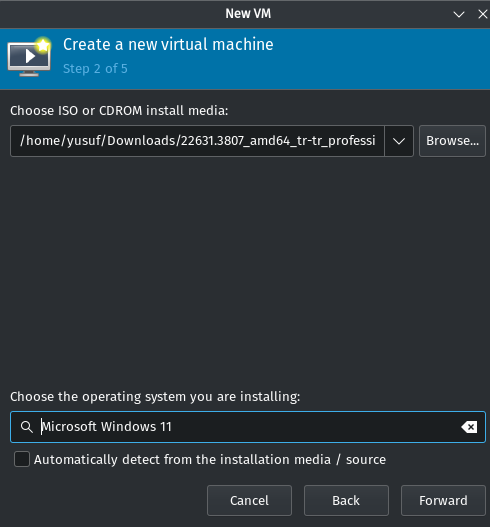
First,click the “Create Machine” button in the top left corner of the Virtual Machine Manager window. By default, you will ask you to select a upload media, select the ISO file from the drop-down menu and automatically detect the system type below. If it does not detect, type of system.
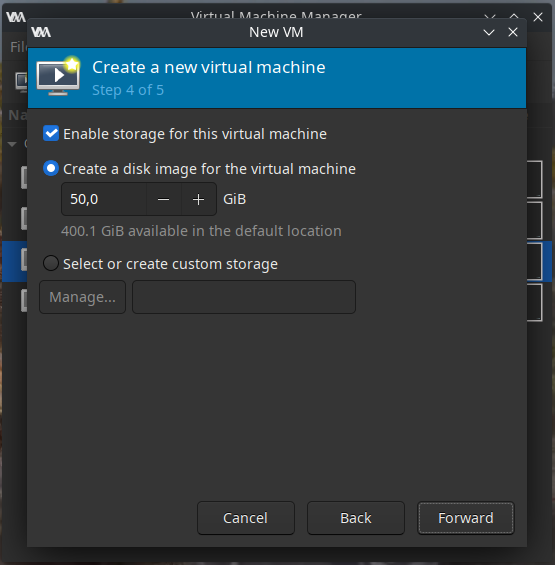
If you are using Windows 10 for disk size, you should write at least 50 GB if you are using Windows 11, at least 128 GB.
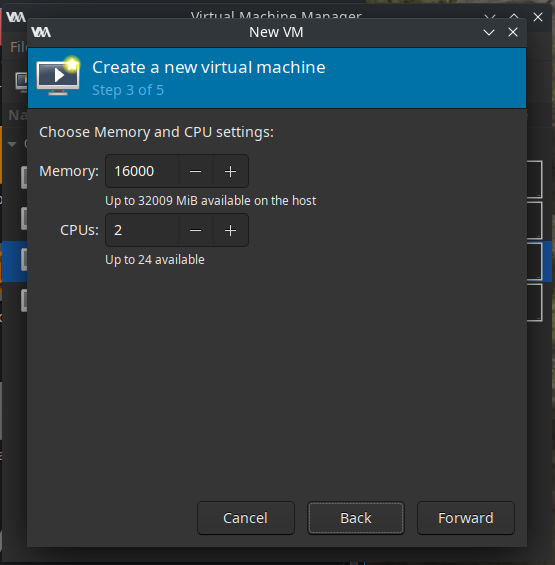
We set RAM on the next screen. Don’t give all your RAM to the VM, your computer crashs. It is advisable to leave a RAM from 1 to 3 GB on your host.
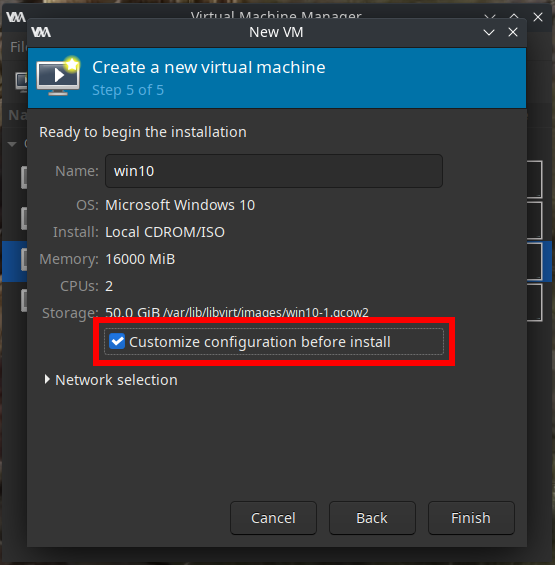
In the summary section, mark the “Customize configuration before install” tick.
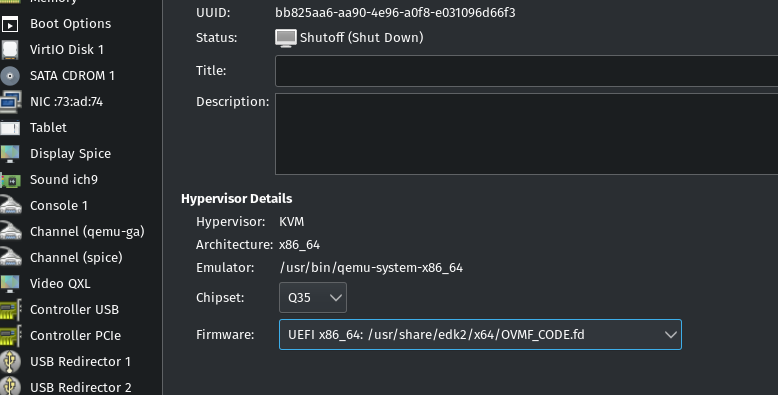
For subsequent settings, do not forget to press the “Agreat” button at the bottom right after each step. Now,in your VM you are in the Overview tab in your public settings. In this tab, at the bottom, set the chipset to “Q35.” Select a UEFI firmware, depending on your deployment, the names may vary, but it always ends with “OVMF_.fd” or “ovmf-.bin.”
If you are using Windows 11, you should choose what ends with sec-boot.

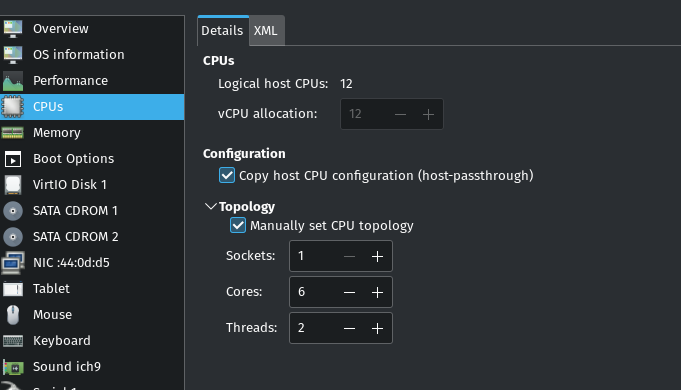
Go to the CPU tab. Mark the “Copy host CPU configuration” tick and
expand “Topology. Mark the “Manually set CPU topology” tick and change
the setting depending on your CPU. For more CPU about your processor lscpu you can run the command.
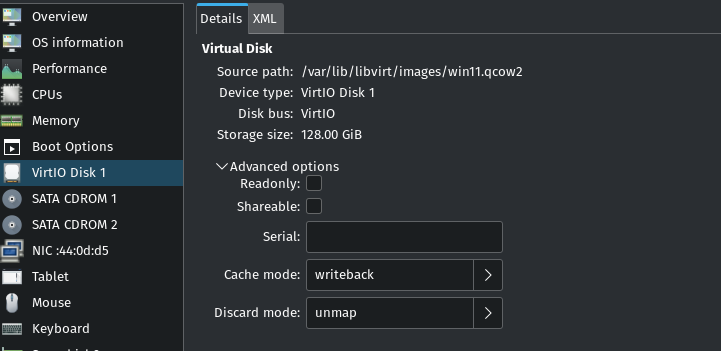
Then, choose the “Disk 1” drive. Set “Disk bus” to VirtIO. Open “Advanced Options” and set “Cache mode” option to “writeback.”
Go to the “Boot Options” tab make sure that “SATA CDROM 1” is selected and in the first position. This is your Windows 10 or Windows 11 ISO file.
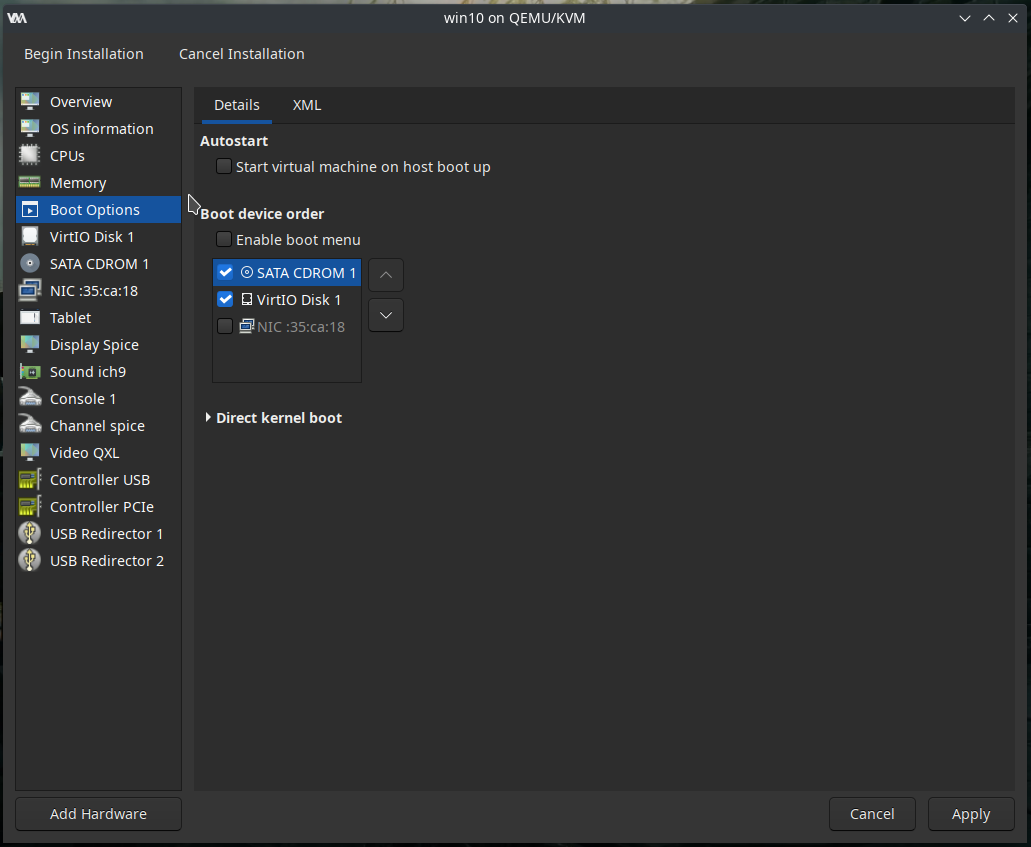
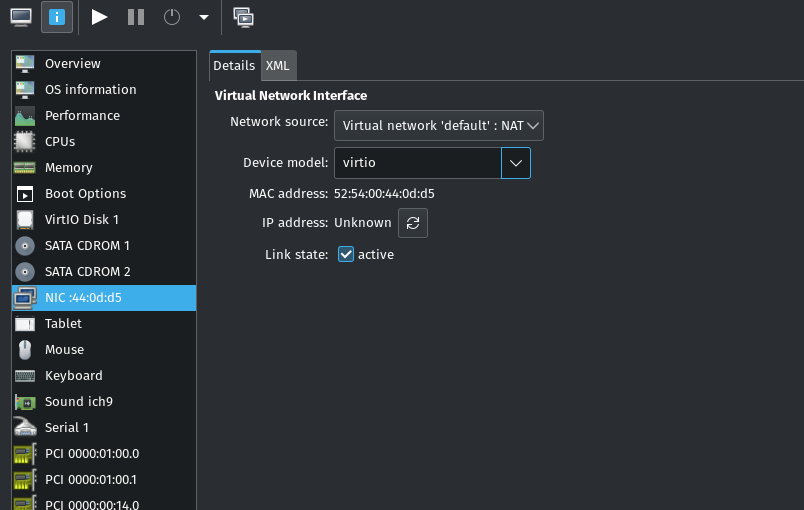
Click “Add Hardware” from the bottom left to “Device Type” CD-ROM device, and select your previously downloaded VirtIO ISO file. Make sure Sata CD-Rom 2 is ticked on Boot options, but not first. This will help us install our VirtIO drivers Finally, come to the network tab and select the drive model as Virtio. Uninstall the link state mark, this tick will discontinu internet access to the VM. Installing without the Internet is usually healthier on Windows.
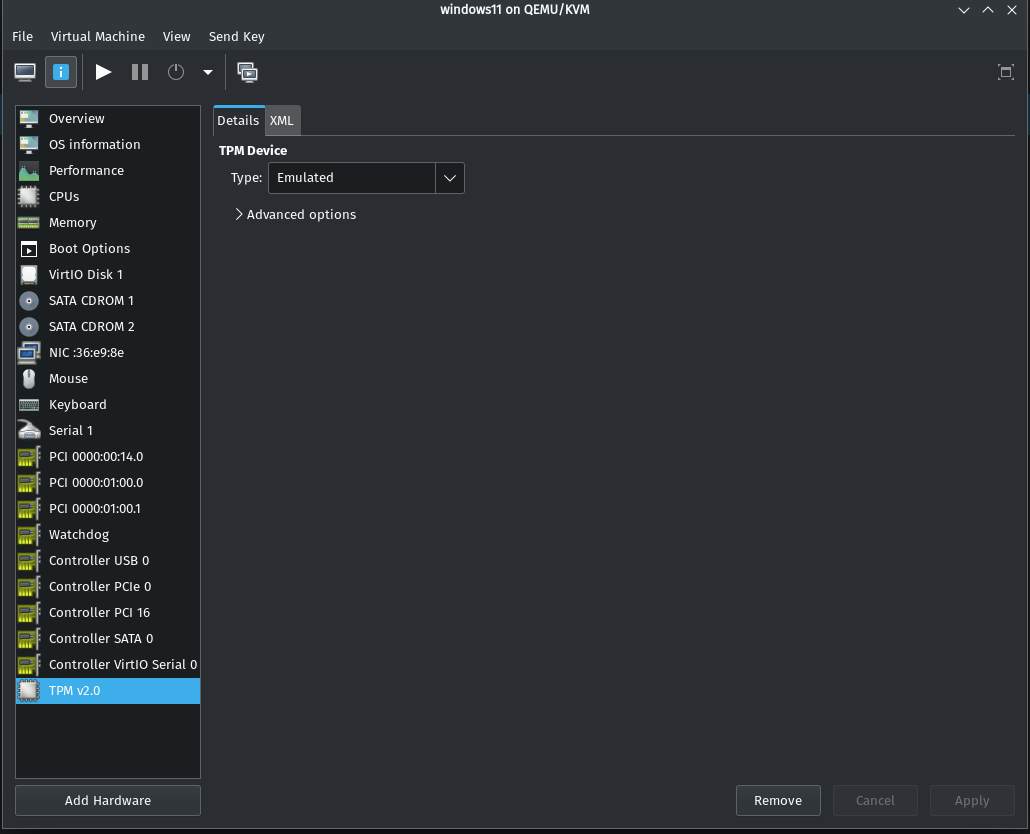
Note: If you are using Windows 11, you should add virtual TPM. For this, it is necessary to have a swtpm package installed in your system.
4.3 Windows Setup
You may have noticed that we haven’t added the GPU to the VM yet. We need to complete the Windows installation before adding the GPU.
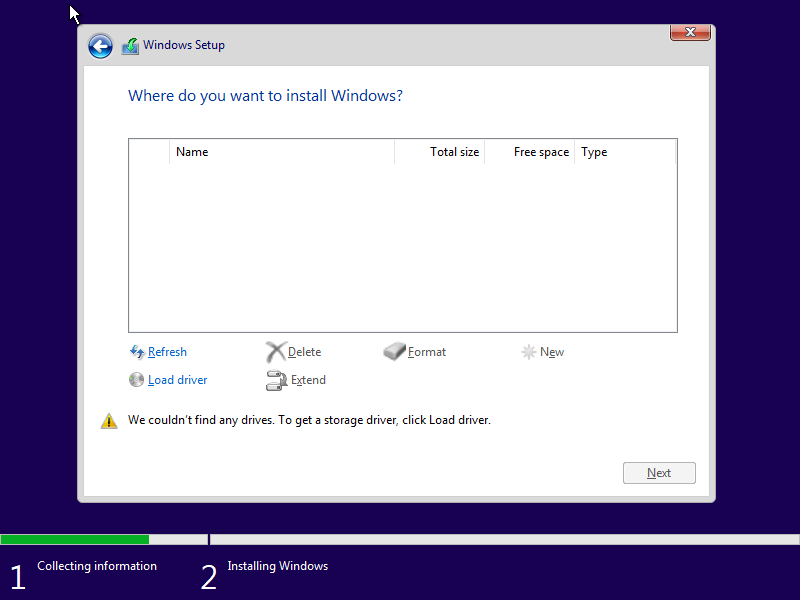
On the disk select screen, you will notice that our disk does not appear because VirtIO drivers are not installed. We click on the load driver option below and install the required drive from our ISO file.
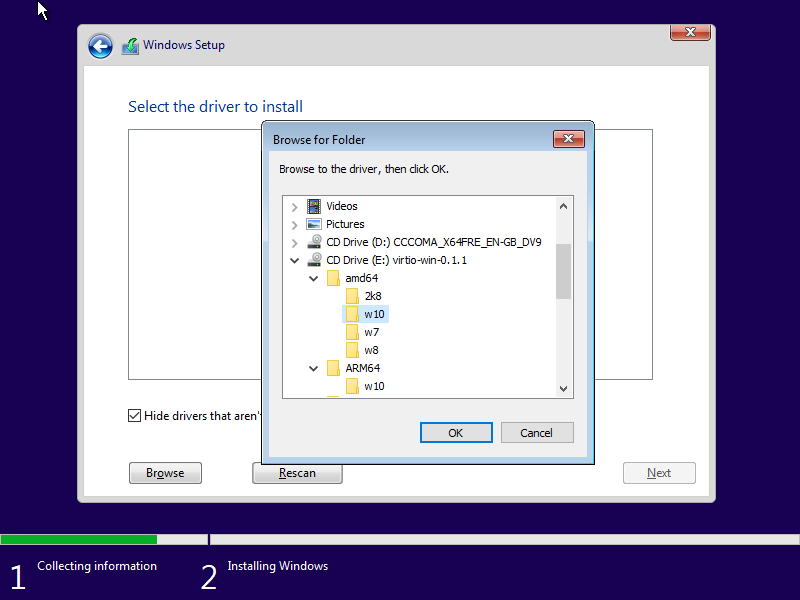
If you are using Windows 11, select the w11 type-writer folder.
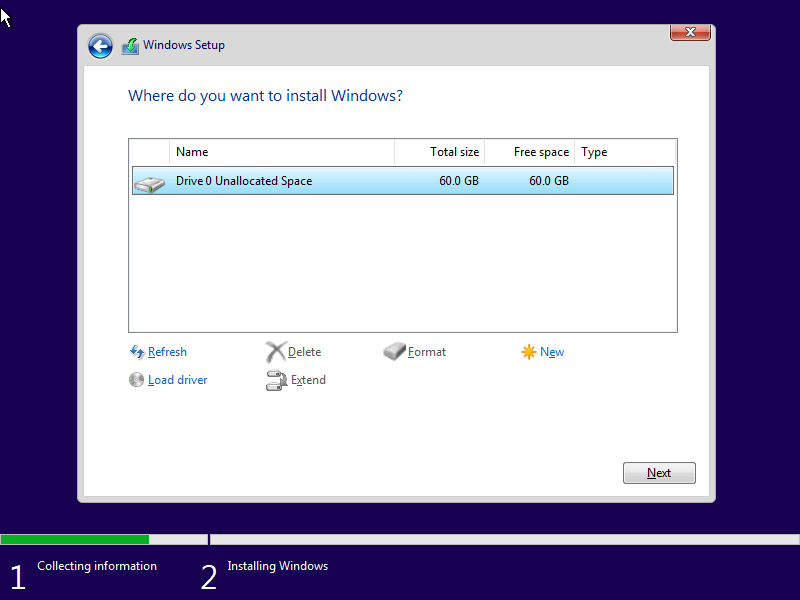
We can now perform the installation.
5 - Preparation and Placement of ROM File
Your VM needs to access the ROM to properly function with your GPU. This is mostly true for NVIDIA cards and some AMD cards. You have multiple options to make your ROM file. You can also download your ROM from TechPoweredUp, but this is not recommended. Because you can download the old ROMs and face the problem.
5.1 Transfer Your GPU ROM to File
5.1.1 Option 1 (If you use Linux)
FOR NVIDIA: First of all, download the latest version of NVFlash Linux to an easily accessible folder and open the file. The file name must be nvflash.
FOR AMD: AMDVBFlash / ATI ATIFlash Download the latest version of Linux to an easily accessible folder and open the file. Pay attention to the file name, it should be like amdvbflash.
Ctrl + Alt + F2 open the TTY screen with. (If not opened, try the F key differently.)
After logging in with your username and password, you need to stop your Display Manager service. The name of this service may change according to which desktop environment you are using.
For GNOME: sudo systemctl stop gdm3
For KDE: sudo systemctl stop sddm
For XFCE: sudo systemctl stop lightdm
If you are using Ubuntu and you are stopping gdm3, I will show you how you can solve this segment at the end of this segment.
To successfully convert your GPU rum into file, we need to tell your core to stop using drivers for this. This modprobe -r we can do it with command.
Run the following commands according to your video card:
NVIDIA
sudo modprobe -r nvidia_uvm
sudo modprobe -r nvidia_drm
sudo modprobe -r nvidia_modeset
sudo modprobe -r nvidia
AMD
sudo modprobe -r drm_kms_helper
sudo modprobe -r amdgpu
sudo modprobe -r radeon
You can also get a no-releament error even if you use other software for your video card. For example, I got a mistake because I used the be ollama. It’s good to take care of that, too.
Now we can transfer the ROM to the file. Enter the following commands depending on which software you will use.
NVIDIA
sudo chmod +x nvflash
sudo ./nvflash --save etcios.rom
AMD
sudo chmod +x amdvbflash
sudo ./amdvbflash -s 0 vbios.rom
Note for AMD GPUs: 0 in the parameter is your adapter, if yours is not 0, you can find out which number you should put here using sudo ./amdvbflash -i command.
Now we can return to our system by reloading modules.
NVIDIA
sudo modprobe nvidia
sudo modprobe nvidia_uvm
sudo modprobe nvidia
sudo modprobe nvidia_modeset
AMD
sudo modprobe drm_kms_helper
sudo modprobe amdgpu
sudo modprobe radeon
In the same way, we can start the display manager back.
For GNOME: sudo systemctl start gdm3
For KDE: sudo systemctl start sddm
For XFCE: sudo systemctl start lightdm
I just told you that people who use Ubuntu might have trouble. If you are using Ubuntu, make the following steps to extract the modules and extract your ROM file.
sudo systemctl set-default multi-user
gnome-session-quit
5.1.2 OPTION 2 (If You Use Windows)
When you install the GPU-Z program and press the part on the arrow, it will transfer the ROM out for you. Deliver this to your Linux system somehow.

5.2 ROM Patches Our File
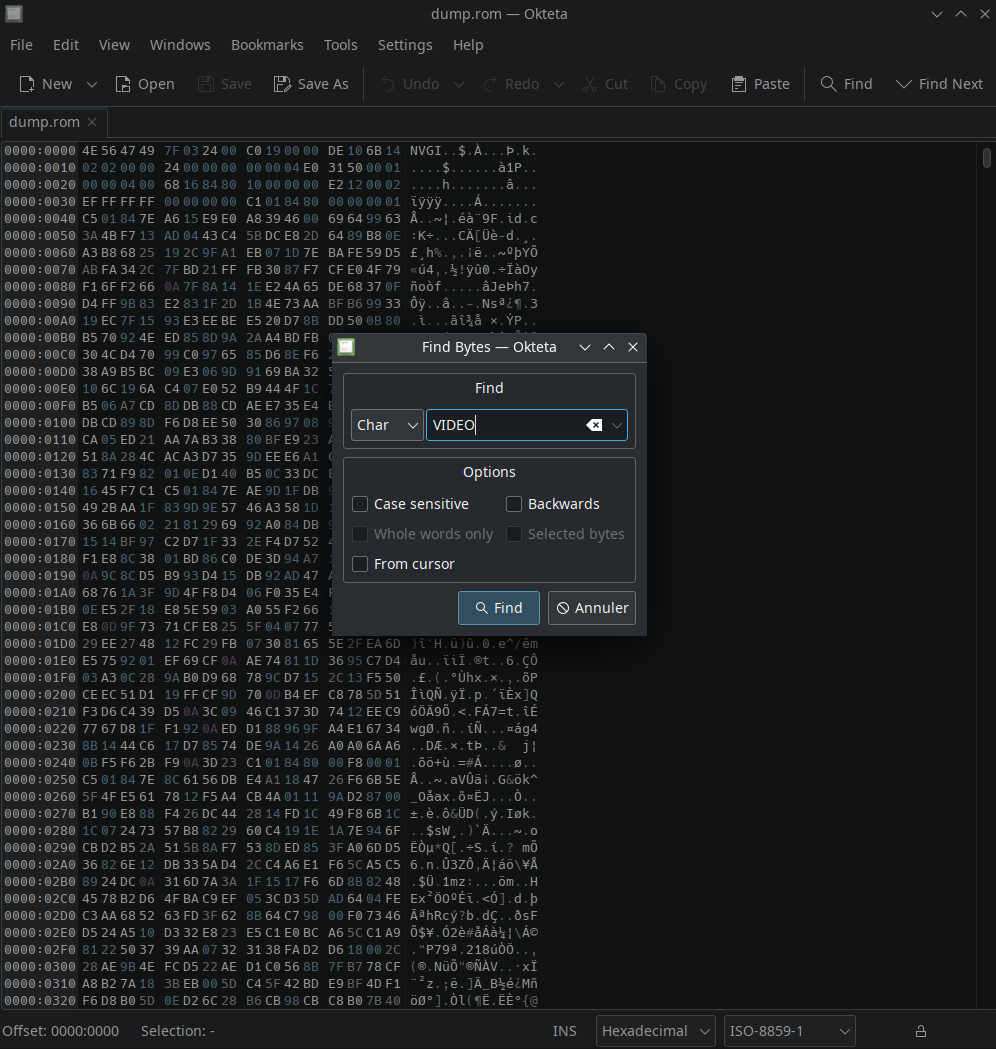
It’s easy to patch your ROM. This process is not required for AMD ROMs. You will need a hex editor like Okteta on Linux, or HxD if you’re still using Windows. Open a copy of your rum file in the editor of your choice, hiding the original in a secure place. To access the search function, press Ctrl+F and search VIDEO in Char setting:

Now, before the first U before the VIDEO we just called, place your cursor like this and choose everything before it:
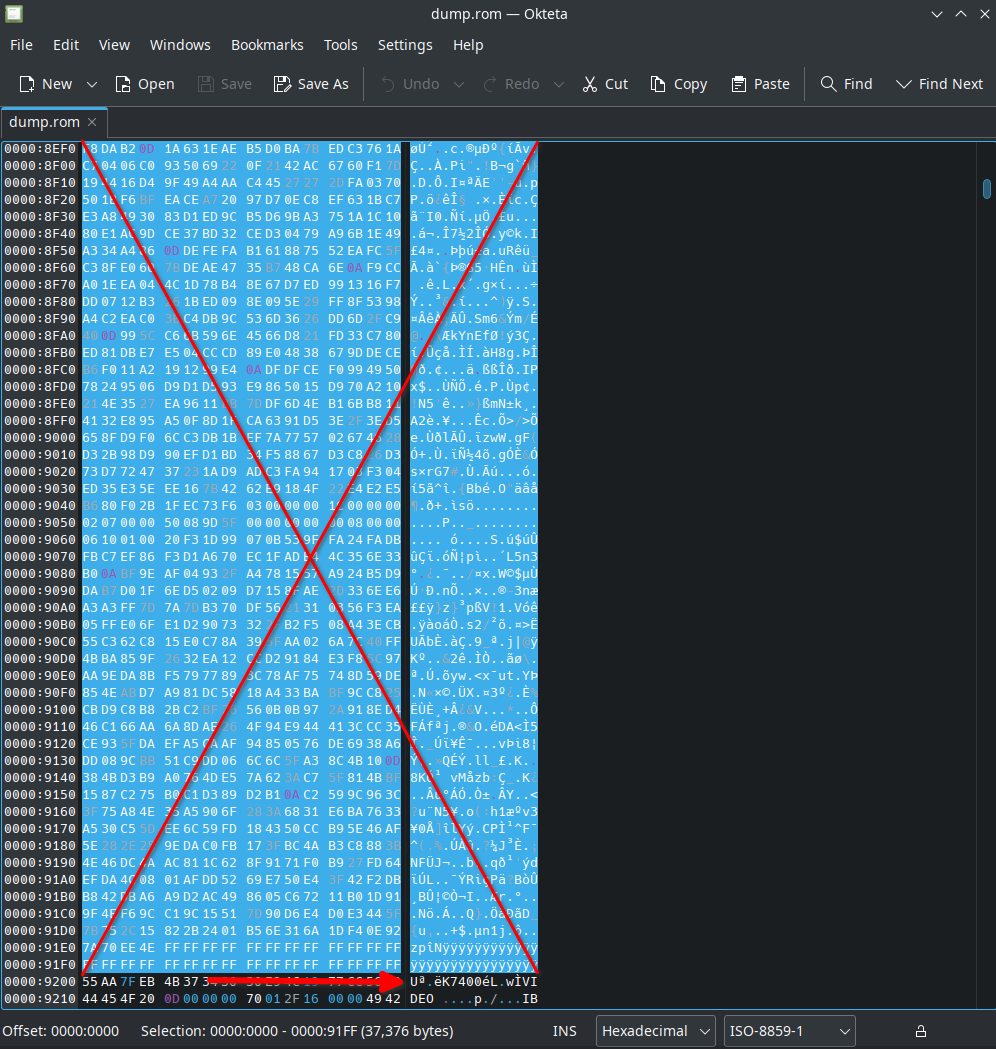
Press the DEL key and delete your selection when everything before U is selected. If you can’t delete in Okteta, change the editing mode by pressing your INSER key or changing mode from the bar under the Octa window (INS or OVR mode). You must finally get a similar result:

Save the file with a different name like patched.rom. Your ROM is now patched and available!
5.3 Place ROM
This step varies according to your Linux distribution. Please place your ROM according to your distribution.
For Many Distributions:
sudo mkdir /usr/share/vgabios
cp ./patched.rom /usr/share/vgabios/
cd /usr/share/vgabios
sudo chmod -R 644 patched.rom
sudo chown oniichanx:oniichanx patched.rom
For Fedora Based Distributions:
sudo mkdir /var/lib/libvirt/vgabios
cp ./patched.rom /var/lib/libvirt/vgabios/
cd /var/lib/libvirt/vgabios/
sudo chmod -R 644 patched.rom
sudo chown yourusername:yourusername patched.rom
sudo semanage fcontext -a -t virt_image_t /var/lib/libvirt/vgabios/patched.rom
sudo restorecon -v /var/lib/libvirt/vgabios/patched.rom
Your ROM should look like this:
-rw-r--r-- 1 wormstweaker wormstweaker 962048 9 oct. 21:30 patched.rom
6 - Scripts and Record Files
When we start our virtual machine, some scripts have to work in the background. We’re gonna do this with qemu hook.
6.1 Download the Warehouse
The one who prepared these scripts is Risingprism.
git clone https://gitlab.com/risingprismtv/single-gpu-passthrough.git
Then we will enter the incregate and run the command below.
sudo chmod +x install_hooks.sh
sudo ./install_hooks.sh
Make sure all the files are settled correctly. It should be like below.
/etc/systemd/system/libvirt-nosleep@.service
/usr/local/bin/vfio-startup.sh
/usr/local/bin/vfio-teardown.sh
/etc/libvirt/hooks/qemu
/etc/libvirt/hooks/qemu come to the file if [[ $OBJECT == "win11" ]]; then you need to write “win11” in the section whatever the name of your virtual machine is. The hook won’t work.
Note for KDE Users: If you are using KDE, you may want to make the following addition that I wrote to the script.
function kill_yusuf_processes_except_ssh {
    # Get the list of SSH and Bash process IDs for user yusuf
    ssh_pids=($(pgrep -u yusuf ssh))
    bash_pids=($(pgrep -u yusuf bash))
    echo "ssh pids: $ssh_pids"
    echo "bash pids $bash_pids"
    # Combine SSH and Bash process IDs into one array
    exclude_pids=("${ssh_pids[@]}" "${bash_pids[@]}")
    # Kill all processes of user yusuf except the SSH and Bash processes
    for pid in $(pgrep -u yusuf); do
        if [[ ! " ${exclude_pids[@]} " =~ " ${pid} " ]]; then
            kill -9 $pid
        fi
    done
    echo "$DATE All processes of user yusuf killed except SSH and Bash processes"
}
kill_yusuf_processes_except_ssh

sleep "1"
The reason I added this was because we stopped the service with
systemctl at KDE, the user’s operations were not closed, so I was having
trouble removing the nvidia module. The above command kills all
transactions of the user other than SSH and Bash. Of course you yusuf you must enter your own username in the part that is written. /usr/local/bin/vfio-startup You can add this to the script just before the modules are removed.
Location of 6.2 Debugging / Recording Files
If you have made the setting in 3.1.3, your registration files will be as follows. This part is important because you may encounter bugs you do not expect, and you can’t solve problems if you don’t understand where it doesn’t work.
sanal-makine-adı.log => /var/log/libvirt/qemu/sanal-makine-adın.log
custom_hooks.log => /var/log/libvirt/
libvirtd.log => /var/log/libvirt/
If you have problems, I recommend you to review custom_hooks.log,
virtual-machine-name.log and libvirtd.log records respectively.
I also recommend that you connect SSH with a second computer and manage
this main computer. Thus, you can reach your registration files faster instantly.
On your master computer to install SSH connection sudo systemctl start ssh write and from your second computer ssh oniichanx@lokalipadresin you can connect in the form.
7 - Assigning GPU to your VM
Now we’re going to add the GPU to the VM!
7.1 Wi-in the Virtual Image Server
By default, the image procho comes with Spice, but we don’t need it anymore.
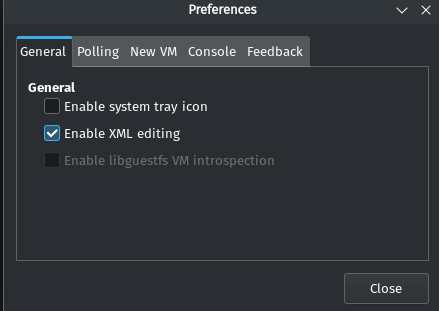
Come to the Virt Manager => Edit => Preference and activate “Enable XML editing.”
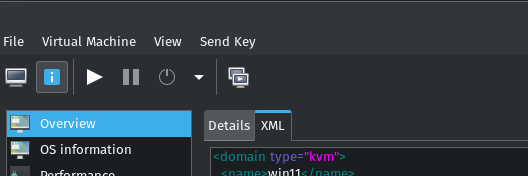
Then come to the XML part of your virtual machine.
And delete the following parts:
  <graphics type="spice" autoport="yes">
    <listen type="address"/>
    <gl enable="no"/>
  </graphics>
`<audio id="1" type="none"/>`
  <video>
    <model type="bochs" vram="16384" heads="1" primary="yes"/>
    <address type="pci" domain="0x0000" bus="0x05" slot="0x00" function="0x0"/>
  </video>
  <channel type="spicevmc">
    <target type="virtio" name="com.redhat.spice.0"/>
    <address type="virtio-serial" controller="0" bus="0" port="1"/>
  </channel>
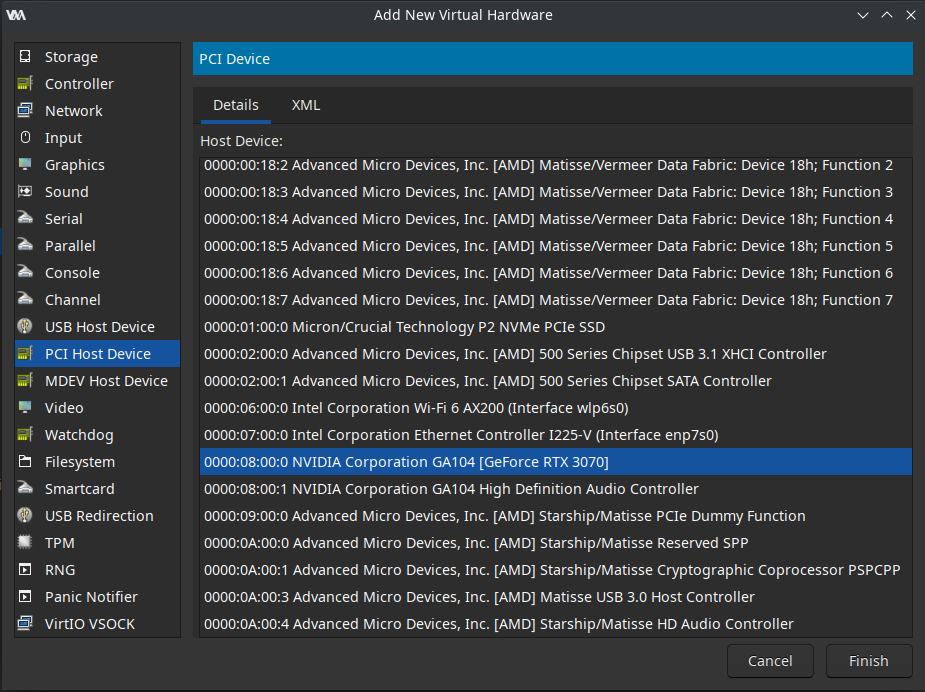
7.1.2 We Add GPU and Our ROM File
You will remember the devices we saved from our IOMMU groups (adim 2) now after clicking “add hardware” from the bottom left, we come to the “PCI Host Device” tab and add the devices we found in our IOMMU group.
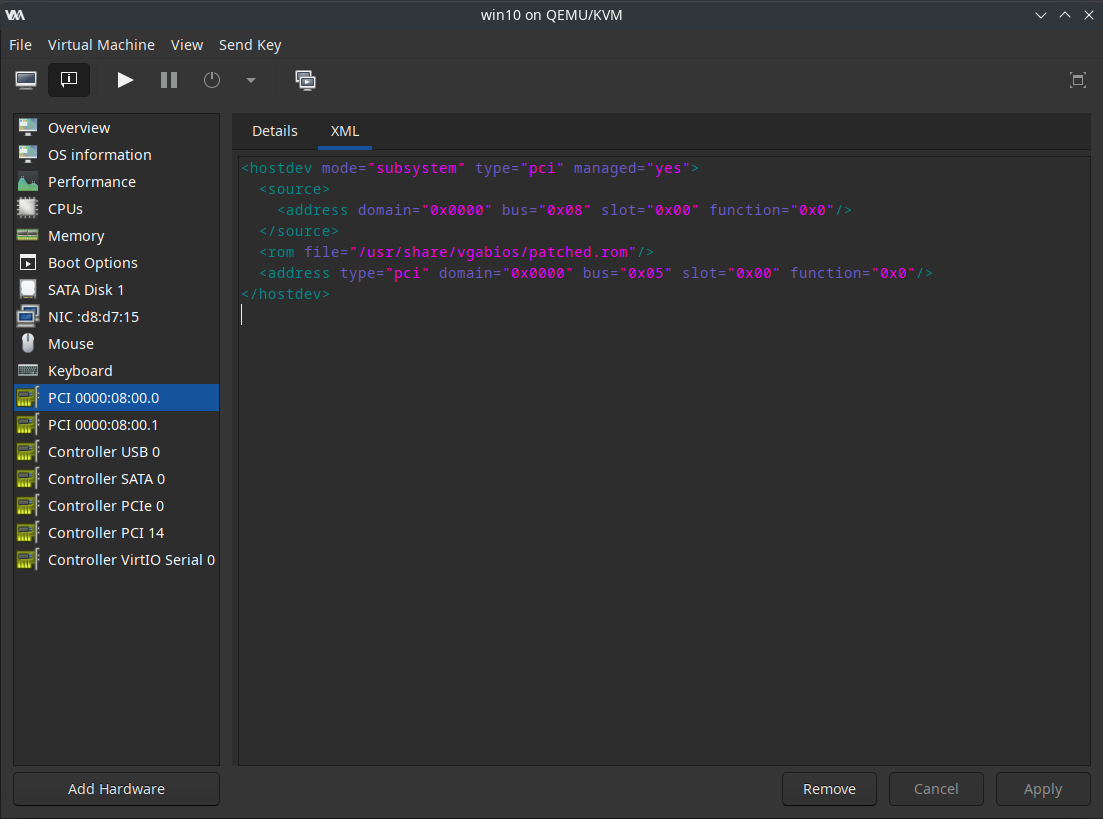
We go to the XML tab of your GPU and add the following line:
<rom file='/usr/share/vgabios/patched.rom'/>
Of course, that depends on the distribution you are using. (Stregged 5.3)
If you are using Fedora based distribution:
<rom file='/var/lib/libvirt/vgabios/patched.rom'/>
7.1.3 (Optional) 1000 Series and Old NVIDIA Cards
For older NVidia GPUs than the GTX 1000 series (included) you may need to add the following parameters to your XML. Your XML <features> go to the section and add the following lines:
  <features>
    <acpi/>
    <apic/>
    <hyperv>
      <relaxed state='on'/>
      <vapic state='on'/>
      <spinlocks state='on' retries='8191'/>
      <vendor_id state='on' value='123456789123'/>
    </hyperv>
    <kvm>
      <hidden state='on'/>
    </kvm>
    <vmport state='off'/>
    <ioapic driver='kvm'/>
For mobile cards, you need to imitate a battery and transmit the seller ID of your card. Change the first line of your XML as follows:
<domain xmlns:qemu="http://libvirt.org/schemas/domain/qemu/1.0" type="kvm">
And at the bottom of your XML, </domain> add this block before:
</qemu:commandline>
  <qemu:override>
    <qemu:device alias='hostdev0'>
      <qemu:frontend>
        <qemu:property name='x-pci-sub-vendor-id' type='unsigned' value='4136'/>
        <qemu:property name='x-pci-sub-device-id' type='unsigned' value='1909'/>
      </qemu:frontend>
    </qemu:device>
  </qemu:override>
</domain>
8 - Final Settings to XML File
For AMD CPUs, you can activate topoext to allow hyperthreading.
  <cpu mode='host-passthrough' check='none'>
    <topology sockets='1' dies='1' cores='12' threads='2'/>
    <feature policy='require' name='topoext'/>
  </cpu>
For Intel CPUs, you can activate SMEP (Supervisor Mode Execution Protection) as follows:
  <cpu mode='host-passthrough' check='none'>
    <topology sockets='1' dies='1' cores='12' threads='2'/>
    <feature policy='disable' name='smep'/>
  </cpu>
If you’ve done everything right now, when you start your virtual machine, your Linux machine will become inactive in the background and your Windows machine will start. When Windows is turned off, your Linux machine will come back!
know issue
If you using SDDM with wayland you much gonna take black screen and freeze when you shutdown VM
So how to fix that
you just need to add to your bootloader
For Grub add to GRUB_CMDLINE_LINUX_DEFAULT=
nvidia-drm.fbdev=1
For systemd-boot add to /boot/loader/entries/
nvidia-drm.fbdev=1